Scanning documents is a common daily task in business. Because of this, key information is often locked within images and scanned documents. So you may have to re-key that information into your database, which is tedious to say the least. If you find yourself doing this frequently, you’ll be glad to know that it is possible to build your own text extractor to automate this process. Worry not: no coding is required from you. This article will show you how to set up Docparser to extract text from scanned documents and images and export it to the file format or cloud software that you want.
Create Your Text Extractor with Docparser
Save time and money by automating data extraction.
Try Docparser for free. No credit card required.
What Makes Extracting Text Difficult?
Paper documents are still ubiquitous in every organization, from contracts to invoices and tax records to mention a few. While businesses worldwide are going digital en masse, people still write information by hand and sign documents, so scanned documents are not going anywhere in the foreseeable future. However, you still need to get important data into your database. So extracting text becomes a necessary task, though not without its challenges.

Let’s go over common issues you might encounter when trying to extract the content you need:
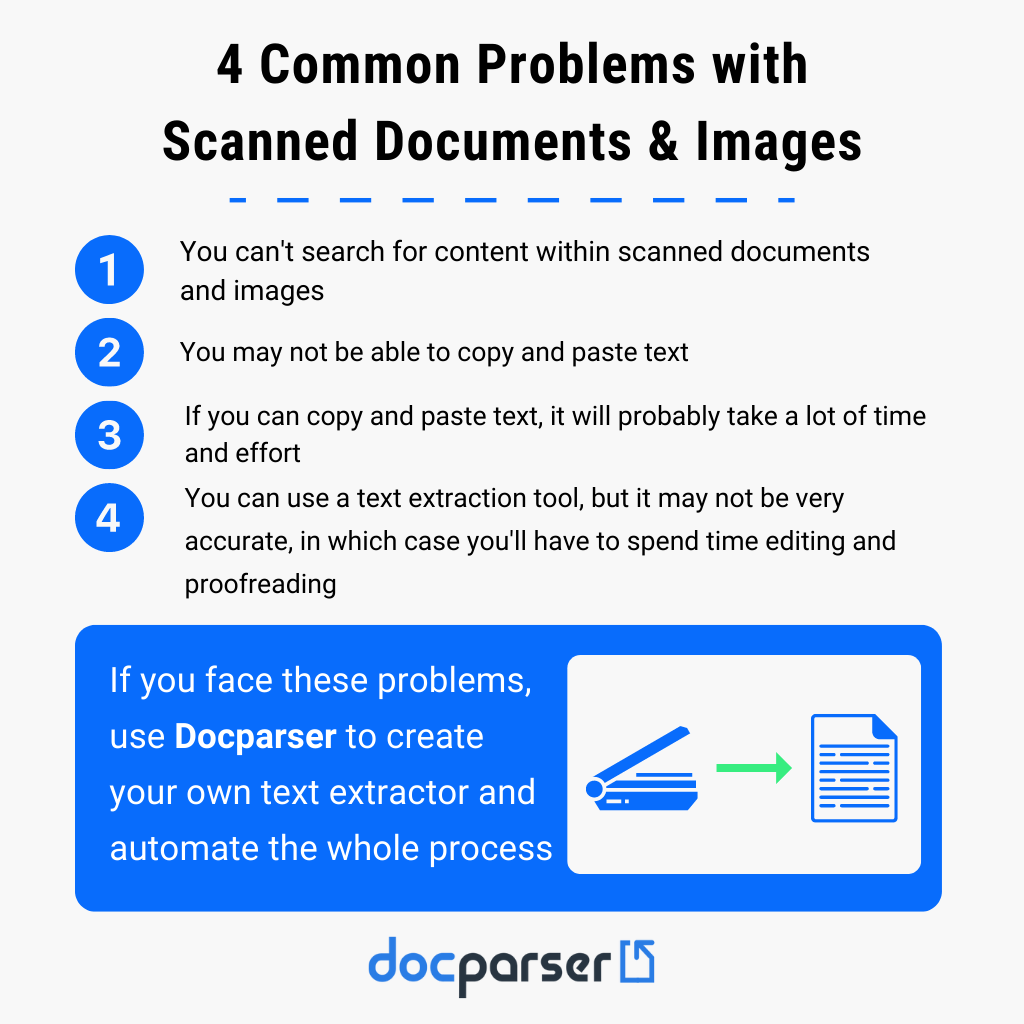
- Scanned documents are not searchable. You can’t search for specific content in scanned PDFs and images unless you extract it.
- Copying and pasting is not possible. You can’t copy text from image files, and scanned PDF files.
- Copying and pasting takes a lot of time. You might use an image-to-text extractor and get a decent result, but then you have to spend time copying-pasting text into your database. So it’s not enough to be able to extract text; you need a tool that lets you quickly send the data wherever you need it to go.
- Extraction tools lack accuracy. You can use tools like Google’s OCR feature to extract text, however the result may not be entirely accurate, in which case you’ll have to spend extra time editing and proofreading the extracted text. And even then, you might make data entry mistakes, which hurts your data quality.
Speaking of data quality, according to the 2022 State of CRM Data Health Report by Validity, study respondents confirmed they were losing money due to inaccurate data:
“44% of respondents estimate their company loses over 10% in annual revenue due to poor quality CRM data.”
— 2022 State of CRM Data Health Report
So it’s pretty clear that text which was manually inputted or poorly extracted tends to have errors or omissions. Not only does this lead to lost time, money, and productivity, but on top of that, it damages decision-making, customer satisfaction, and more.
The good news is that you can leverage technologies like Optical Character Recognition, or to convert documents into machine-readable text.
Docparser, in particular, combines advanced Zonal OCR, advanced pattern recognition, and anchor keywords to accurately extract text from documents, whether they are digital or scanned.
Why Use Docparser as My Text Extractor?
Docparser is certainly not the only text extracting tool you can find online. But it might have the most impact on your productivity.
Here is what you can do with Docparser:
Extract text from scanned images and documents
Docparser has an OCR engine that can extract text from scanned PDFs and images in JPG, PNG, and TIFF format. You get structured data that is searchable and ready for use.
Additionally, extracting data from digital documents is even easier for Docparser.
Batch convert documents
Perhaps the biggest advantage of using Docparser as your text extractor is that you can extract text from multiple documents simultaneously instead of relying on a tool that can only extract text from one document at a time. This is a game-changer when you receive large numbers of documents regularly.
NB: If you receive recurring documents by way of emails, we suggest you try our dedicated email parsing tool: Mailparser.

Save time and money
Automating the process of capturing data means you have more time for high-value and creative tasks that move the needle for your business. This also relieves you from much of the stress caused by manual data entry.
In fact, one of our users is able to save 50 hours of work per month. Try to guess how much money they have been able to save over time since they started using Docparser.
Eliminate human error
An inevitable issue that comes with manual data entry is human error. Inputting incorrect information creates all sorts of scenarios you are better off without: spending hours to find and fix errors, apologizing to a customer because you miswrote their information, failing to forecast demand accurately… These recurrent mistakes can snowball to greatly affect your bottom line.
Export extracted text to different formats and cloud apps
Last but not least is the freedom to move data from one format to another and even from its source to a cloud app that you use.
Specifically, Docparser allows you to download parsed data to Excel, CSV, JSON, and XML formats. You can also connect your Docparser account to a third-party app like Zapier, allowing for thousands of integrations with cloud apps.
So beyond just extracting text, Docparser lets you export it to your database, whether it’s located in a spreadsheet or a cloud software.
How to Create Your Text Extractor with Docparser
Creating a text extractor tailored to your needs is not difficult at all. You don’t have to write code or install anything on your computer. You can do it by yourself in just a few minutes. Let’s see what the process looks like.
Step 1: Create your text extractor
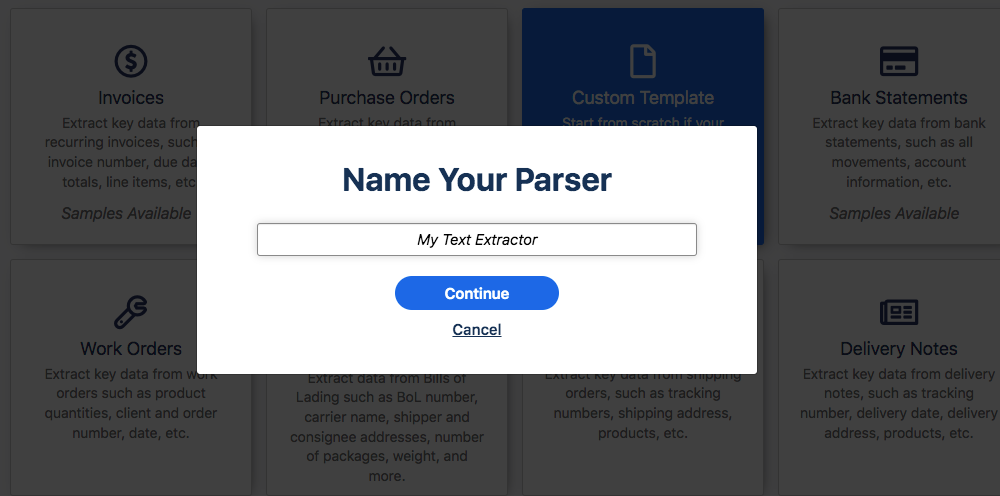
Start by signing up for a Docparser free trial. After that, you will be directed to a screen where you create your extractor, also called Document Parser.
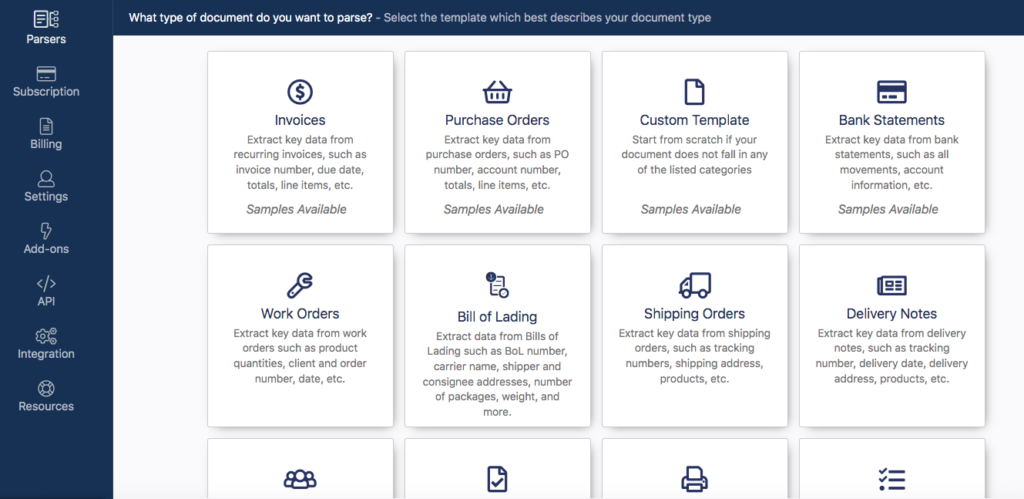
Docparser has a library of built-in Parsers for different types of documents like invoices, bank statements, bills of lading, and many more. These Parsers work best with digital documents, so for scanned documents and images, we suggest you select the category ‘Custom Template’.
Type a name for your Parser and click on ‘Continue’.
Step 2: Upload a few sample documents
To build your Parser, you need at least one sample document. Upload or drag and drop your documents from your local disk.
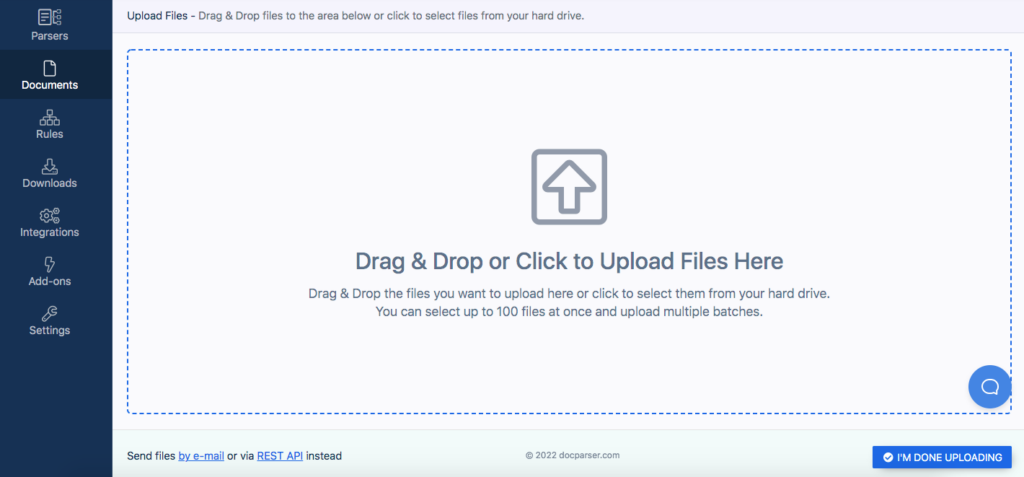
You can also connect your storage provider, email documents to your dedicated Docparser email address, or import them via Docparser’s REST API.
After uploading your sample(s), click on ‘Continue’. Docparser will import and pre-process them then direct you to the Parsing Rule Editor.
Step 3: Create Parsing Rules
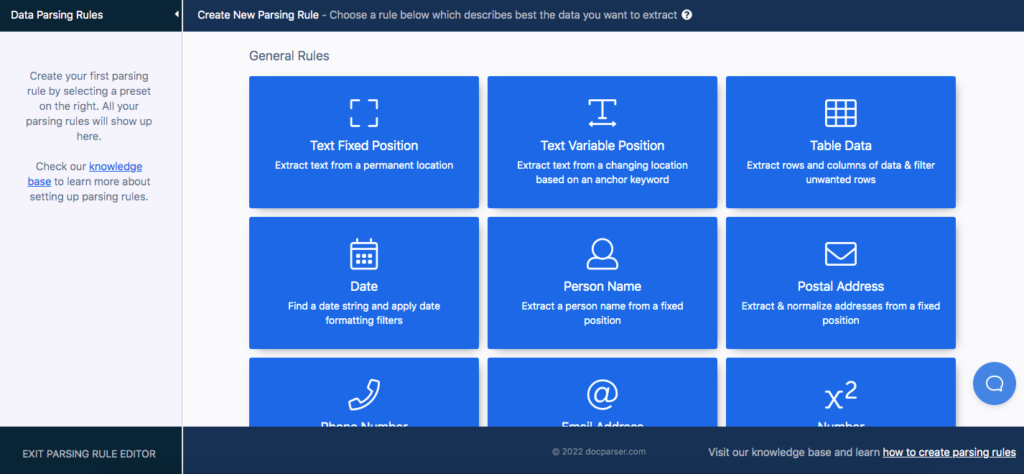
Parsing Rules are the instructions that Docparser’s algorithms follow to identify and extract data from documents. There are various Rules you can use to extract all sorts of data points.
In the ‘General Rules’ section, select ‘Text Fixed Position’.
The Editor will take you to the first page of the document. For this guide, we are using a 5-page scanned document. If you upload an image or document that only has one page, the editor will display it in its entirety right from the start.
Now, all you have to do is draw a rectangle around the text you want with the free form selection box. Once you do that, click on ‘Confirm’.
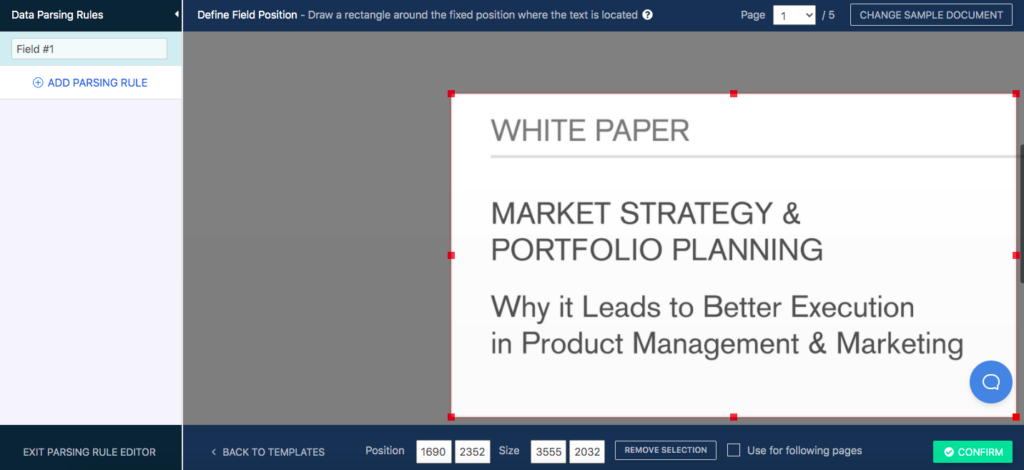
The editor will show you a preview of the extracted text. You can remove empty lines by clicking on the ‘Add Text Filter’ button, scrolling down to ‘Format & Refine Results’, and then selecting ‘Remove Empty Lines’.
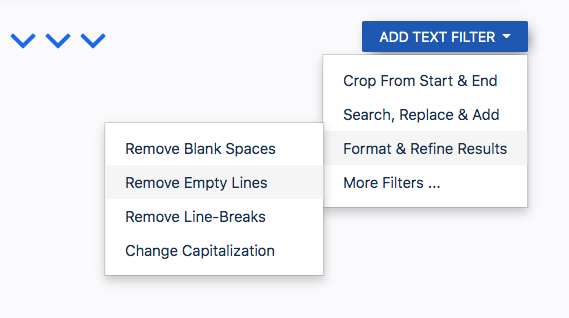
After that, click on ‘Save Parsing Rule’.
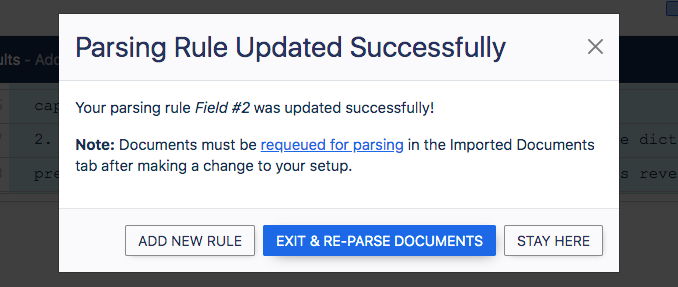
You will see a popup dialog box with three options. We have extracted text from one page so far, and need a second Parsing Rule for the rest of the document. So click on the first option which is ‘Add New Rule’.
For the second Parsing Rule, choose ‘Fixed Text Position’ once again. But this time, select the second page instead of the first.
Use the free form selection box to select the entire text, except for the headers and footers.
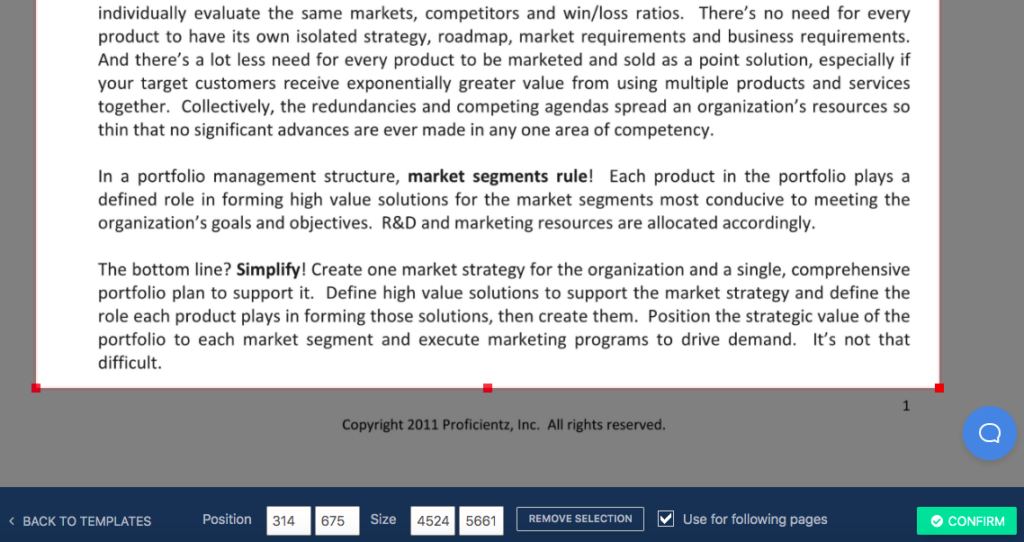
Be sure to tick the checkbox next to ‘Use for following pages’ at the bottom, so that this Rule extends to all of the remaining pages in the document.
Next, click on the ‘Confirm’ button. Check the preview of the parsing results and refine them with additional table filters if needed.
Once you’re done, click on ‘Save Parsing Rule’. Now we have two Parsing Rules, which is all we need to extract all the relevant text from this document.
Once again, the popup dialog box will ask you what to do. This time, choose ‘Exit & Re-Parse Documents’.
Don’t forget to explore our knowledge base to learn more about building Parsing Rules. If you get stuck, let us know and our support team will be in touch shortly.
Step 4: Choose where to export your extracted data
Your text has been successfully extracted! All you have left to do is to decide whether you want to download your data or send it to a cloud app.
Option 1: Download your parsed data
If you want to download your data as a file, go to ‘Downloads’ in the left-hand side panel of your Docparser account. You can download parsed data to Excel, CSV, JSON, and XML.
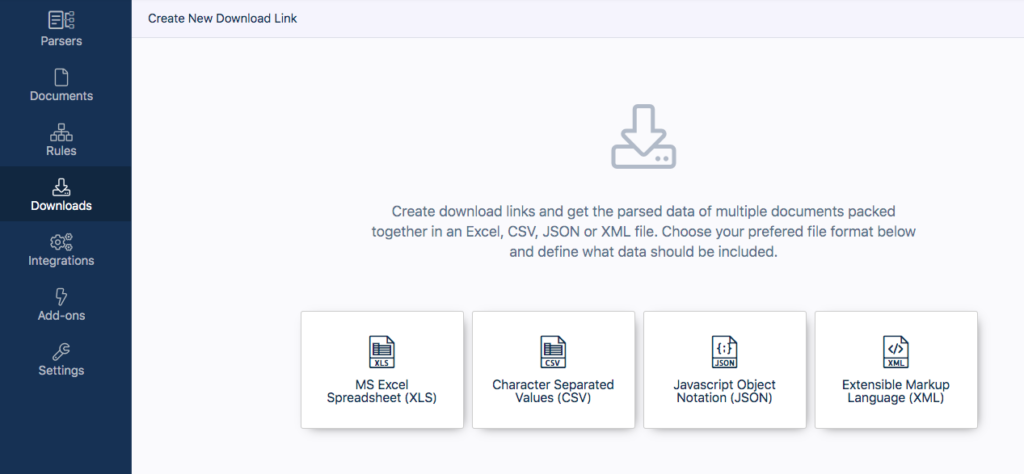
Give a name to your file and click on ‘Save’. Docparser will instantly create a download link; just click on it to save your file on your computer or device.
Option 2: export parsed data to a cloud app
The second option is to create an outbound integration with the cloud app you want. You can connect your Docparser account to thousands of apps thanks to our third-party integration partners, like Zapier and Microsoft Power Automate.
In the left-hand side panel, go to ‘Integrations’, then scroll down to ‘Outbound Integrations’ and choose one of the options available.
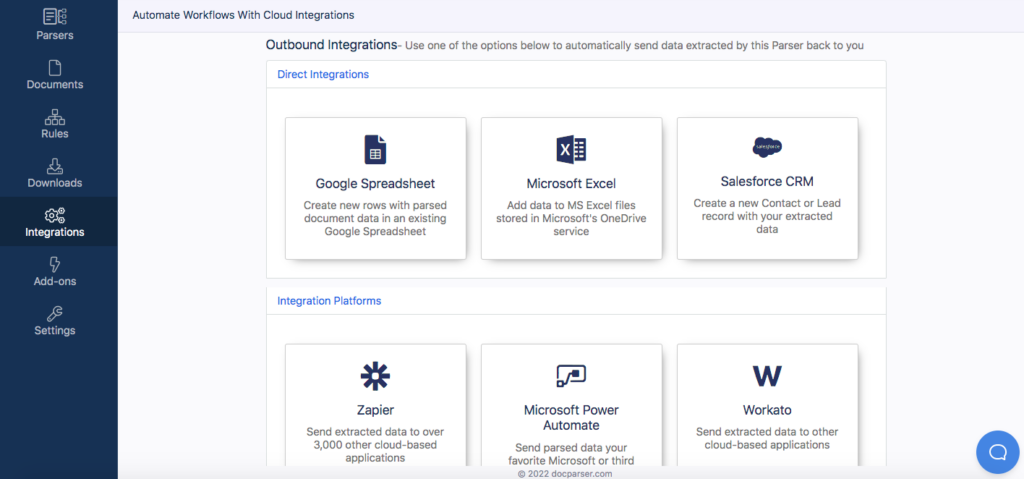
You can create an outbound integration in three ways:
- Direct integrations: Google Spreadsheet, MS Excel, and Salesforce
- Integration platforms: Zapier, Microsoft Power Automate, Workato, and Claris Connect
- Custom integrations: simple and advanced webhooks, HTTP REST API
Pick the option that suits you and follow the simple steps afterwards. For example, if you choose Zapier, log into your Zapier account, choose a Zap, then add the trigger and action you want.
Once your outbound integration is set up, whenever new documents are added to your text extractor, Docparser will automatically parse them and send the extracted data to the desired location in the app you chose.
Docparser FAQ
Does Docparser have a file size limit?
The maximum file size is 20MB. For best results, we recommend that your documents don’t exceed 8MB in size. Note that we can increase the maximum file size for customers on higher subscription plans.
Does Docparser have a page count limit?
Docparser works best for documents with a page count ranging from 1 to 10. Scanned documents that go through OCR have a limit of 30 pages. If your document has 30 pages or more, you may want to split it into separate files by using Adobe’s online splitting tool.
Is Docparser free to use?
You can start using Docparser for free by signing up for a 21-day free trial or a free account. We don’t require your credit card information, so you needn’t worry about automatic billing. When you feel you are ready to upgrade, choose one of our paid plans.
Is my data secure?
Absolutely. We take security very seriously and will never use, share, or sell your data. You choose the retention time after which data is automatically deleted. For more details, read our data security policy.
Start Extracting Text from Documents with Docparser
Inefficient processes cost businesses a lot of money and damage their competitiveness. But thanks to the evolution of automation technologies, you can bypass low-value and tedious tasks to focus on what you do best: delivering amazing products and services to your customers.
Docparser is designed to accurately extract text and other types of data from both scanned and digital documents. Try it for free and find out how much time and money you can save every day.
Create Your Own Text Extractor in Minutes with Docparser
Save time and money by automating data extraction.
Try Docparser for free. No credit card required.

