To add an even greater level of automation to your workflow, Windows machines can be configured to automatically schedule download and save a copy of your parsed data each day without having to install any software. Please note this guide is written for experienced users and does require some knowledge of Task Scheduler.
Following the steps in this guide will require a text editor (such as notepad), administrator privileges, and most importantly a Windows operating system.
How to Schedule Downloads with Windows Task Scheduler
Step 1 – Set up a download
Ensure that you have already set up a working download of your parsed data by navigating to the Download Links tab of your parser and choosing from one of the available formats. If you haven’t yet completed this step, go here and follow the instructions before continuing.
Step 2 – Save the script
For step two we are going to set up a very simple script that will instruct your machine where to download the file from and to. Open a text editor and paste the two lines below;
$client = new-object System.Net.WebClient
$client.DownloadFile(“DOCPARSER LINK”,”LOCAL DIRECTORY”)
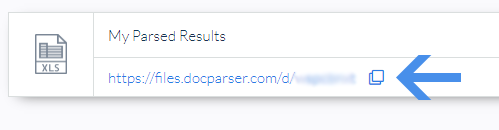
The next thing we need to do is replace the text DOCPARSER LINK with the link to your file download, go to your Download Links page within your parser and select the small copy icon adjacent to the link to easily copy the file URL.
Once the link has replaced the placeholder text, you need to pick a preferred directory on your computer and replace the text LOCAL DIRECTORY. The script should end up looking similar to the example below:.
$client = new-object System.Net.WebClient
$client.DownloadFile(“https://files.docparser.com/d/”,”C:\Users\your_user_name\Documents”)
If everything looks right, save the file to a safe location on your computer as something like ‘DownloadTask.ps1’ – keep a note of the location and filename as you will need this later.
Step 3 – Create a Task
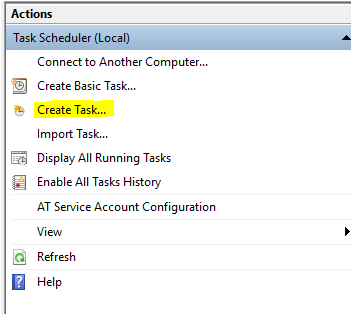
Now we will need to set up Task Scheduler. The two main ways to open Task Scheduler are to select Start, type ‘task scheduler’ and hit enter or hold the windows+r keys and type in ‘taskschd.msc’.
On the top right side of this application, you will find Create Task – click this to start:
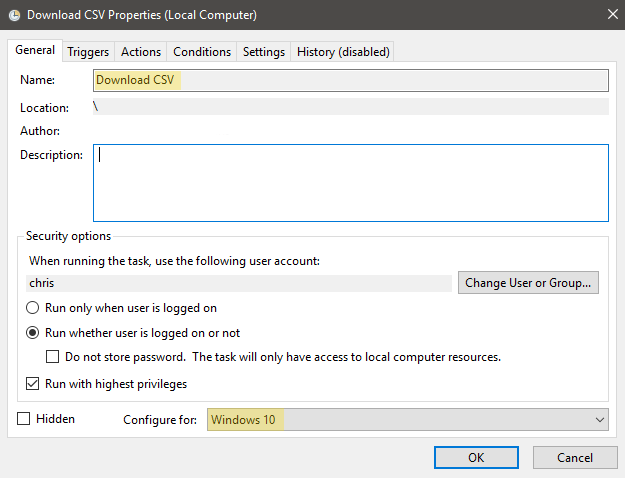
Now you will need to input a name for your task that makes it easy to identify and select the version of Windows you are using:
 Step 4 – Add a Trigger
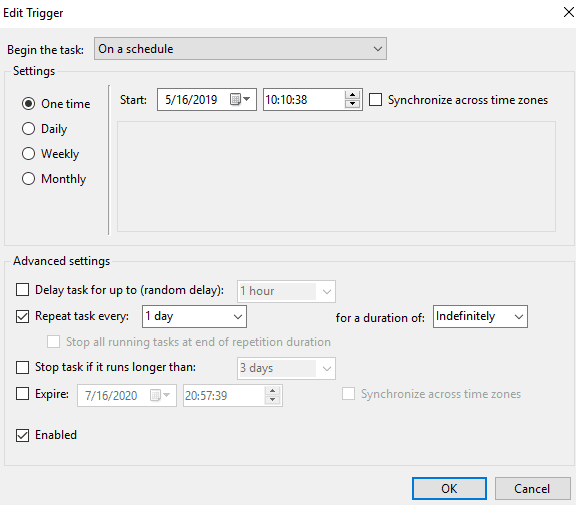
The next step is where we will define how this task will be scheduled, click the Triggers tab and then click New in the bottom left. This screen will allow you to define the start date and time, the frequency and any special conditions you would like to set up. The image below shows a daily download occurring at 10:10 AM:
Step 5 – Add an Action
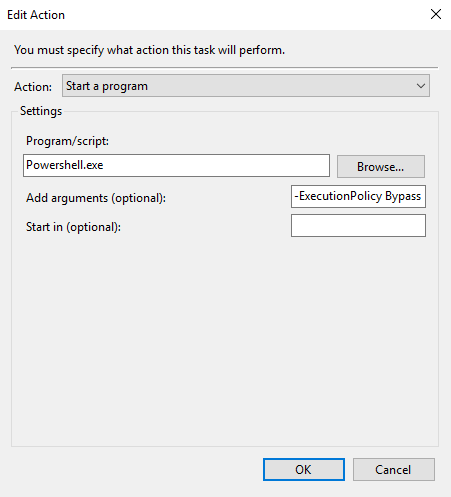
Now to add an action, click the Actions tab and select New in the bottom left of the window. To run our download script we are going to use Powershell, to proceed choose Start a program from the Action drop-down, then under the Program/script field paste or type ‘Powershell.exe’.
We are going to instruct Powershell to automatically run our script from step 2. In the Add arguments field type or paste the following, for ‘LINK_TO_YOUR_SCRIPT’ replace with the full path to the file where your script was saved.
-ExecutionPolicy Bypass LINK_TO_YOUR_SCRIPT
A working argument will look similar to the following line:
-ExecutionPolicy Bypass c:\TaskCSV.ps1
Step 6 – Windows Privileges and Troubleshooting
The final step in this set up will depend largely on how your Windows environment has been configured and managed, for any issues during this step please contact your network administrator for assistance.
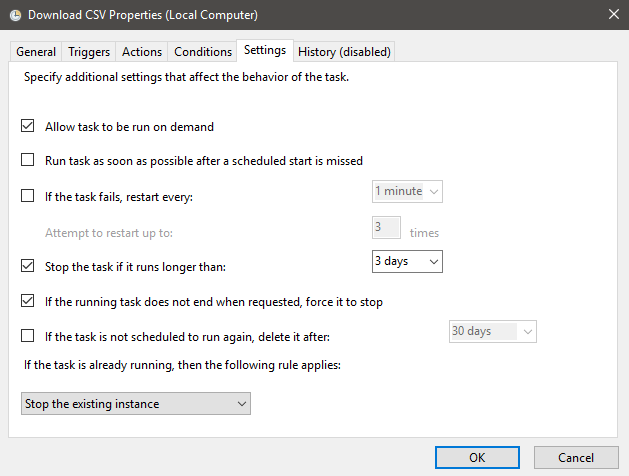
Click the Settings tab and ensure that the checkbox Allow task to be run on demand is checked and the drop-down at the bottom is set to Stop the existing instance.
Now go back to General, select the checkbox Run with highest privileges and verify that the correct account or system name is selected then click OK.
If you encounter any issues click the Change User or Group button, type your system/account name and click the Check Names button. Once a name has been found click OK on both dialogue windows and you are done!
For any issues relating to this setup, please consult the Windows help guide on Task Scheduler and/or check with your IT administrator regarding user privileges. If you continue to have trouble, please feel free to reach out to [email protected]/ and we will be happy to assist.